BREATHCATCHERS leather fetish designs
Corset wear and care
Though it may be tempting, don't tighten your corset too much for the first few times you wear it. It needs time to mold to your body and take the strain of waist reduction evenly. If you tighten it too much at first you might warp it. Once this happens it will never fit you properly. The first time you wear it you should have no more than 2,5 cm or 1inch of reduction.
Wear it for 2-4 hours or as long as comfortable. Do this for the first 3 or 4 times u wear it. Excessive force applied too quickly is the most common cause of damaged corsets, so keep this in mind when you go for new levels of reduction.
We don't recommended you to clean your corset every time you wear it, it's not necessary.
Just hang it up and let it air out each time you wore it.
Never put your corset in the wash - there is exposed steel which will rust over time. For tips on how to clean leather, see our leather care article.
Protect your corset when in storage, you can hang it up on a hanger or lay it flat in a drawer.
If you take care of your corset it will last for many years to come.
Don't feel as if you have limit how often you wear it though. In fact, the
more you wear it the more comfortable it will feel and the normal wear over time will add character to its look.
Lacing your corset.
Here we show a good method on how to lace a corset.
This style is more difficult to use at first, but is better at stopping the laces from slipping while you are putting it on and easier when you finished the lacing to pull it tighter.
The lacing you can do yourself, even if the closure is on the backside, but take your time for this. With a back lacing and no busk, you can lace it on front and then turn it around.
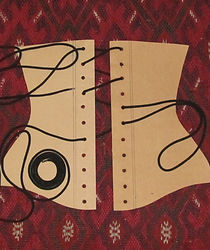
Step 1.
Start by feeding the lace through the set of eyelets closest to your waist, from the outside of your corset, creating a loop on the outside, depending on the style of corset, one end should be a bit longer then the other.
Hold the two sides close to each other (or count eyelets) and lace from the inside out, leaving the two eyelets across the loop free. This is where the loose ends will finish.
Now you can lace to the top of your corset, skipping one eyelet.
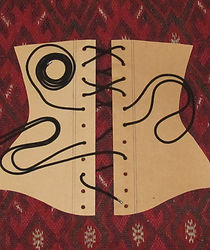
Step 2.
When you arrive at the top, go down filling the eyelets you left open. It does not matter if you end up outside or inside at the top, if you skipped one eyelet per time, it ends up correct. Make sure you use the same system going down, otherwise it does not look nice. The system we used here has the least friction on the leather, crossing over and under.
When you arrive at the waist across the loop, you are finished with the top part.
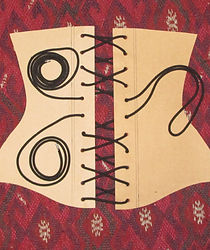
Step 3.
This is the same as going up, again, make sure you use the same system, crossing under and then crossing over has the least friction on the leather. When arriving at the bottom of your corset, continue lacing up. You might end up at a different side at the bottom, this is because the amount of eyelets is different then going up. Reaching the waist, you meet with the other lacing, tie the two ends together, creating a loop.
Now, with a back lacing, you can turn the corset around.
By pulling the loops, slowly, you tighten your corset, tie them in a bow, and the work is done.
If you have a corset with a busk closure, you can do this lacing before putting it on, leave enough space to close the busk, you might damage it when you hook it up under pressure.
When taking your corset off, take care with the busk as well, make sure there is no pressure on the busk while you unhook it.
Remember that throughout this whole process to keep the laces untwisted as you won't be able to do this once it is closed.
step 1
step 2
step3
Leathercare
A few tips of how to care for your leather.
After going through the expense and excitement of selecting your leatherwear,
sometimes it is easy to forget to regularly clean and maintain these items.
Remembering that leather wear is, after all, skin, it needs to be regularly cleaned and conditioned to maintain top lasting quality, comfort, and texture.
Within this article, you’ll find all the information you need to care for your leather products.
Cleaning leatherwear.
When wearing your leather, any continued contact with moisture, (sweat, urine, alcohol, for example), can cause damage to the leather that results in uncomfortable stiffening.
Using baby shampoo, fill a bucket with warm, soapy water to lightly wipe down your leather to remove and prevent marks, stains, and odors.
Baby shampoo can also be rubbed directly on the leather to help remove oily stains. Take care to rinse the soap with clean, warm water from all leather surfaces, taking special care in areas of folded leather or around buckles, keepers, or fastenings.
It’s wise to disassemble garments and restraints with fastenings to be able to reach any areas where leather folds around a buckle or keeper: these areas can become very dry and are vulnerable to not only retaining odor or stains, but also becoming cracked and dried out.
To dry your leather products, lay them flat in a ventilated area for up to 48 hours to air-dry as needed, never use a heating implement or position your products on or near a heat source to speed drying! This will and can dry out the hide of the leather wear and cause stiffening or even curling of the leather.
As the leather items dry you may use a leather conditioner, a good shoe polish will work, on all non-suede surfaces of the leather to condition and protect the hide.
Wipe on leather conditioner with a clean, dry towel, making certain to wipe away any excess conditioner not soaking into the grain of the leather.
If your leather is wrinkled, you can straighten it out by wearing it and use your body temperature.
For larger and wider pieces this might not work, then you can also iron your leather.
Use a cotton cloth to cover the leather you need to iron, and use medium heat. Iron on the leather side, not on the suede side.
Do not iron when the leather is wet!
Removing leatherwear stains.
To remove sweat stains on your leather items, follow these simple instructions.
Leather can become stiff or even irritating and itchy if sweat has permeated the leather item.
To help soften the item and prevent further irritation, you can hand-wash the item with warm, soapy water,
(using baby shampoo, as above, and NEVER detergent or other harsh cleaning products), or use a very small amount of fabric softener.
To remove stains caused by oil-based lubricants, try using a few tablespoons of Lux Flakes or a small amount of baby shampoo with warm water directly on the stain. Gradually rub the soap into the stain to lighten and remove them. Oil-based lubricant stains can be very difficult to remove, but either of these products used should help lighten the stain if not completely fade it from the surface of your leather item.
To remove wax, set your iron on a low setting, (cool being preferable.) Apply a sheet of blotting paper directly on top of the wax stain.
Use the iron to slowly go over the stain, changing blotting paper as necessary when the paper begins absorbing the wax.
Continue to do this until the wax is completely lifted from your leather item.
Urine stains will cause severe damage to leather if not washed off immediately. If you should get a urine stain on your leather product, wash it IMMEDIATELY with warm, soapy water. Do not let the stain soak into the grain of the leather or leave the item overnight.
Care of metal fittings.
If not cared for properly, metal fittings on your garments and restraints, including buckles, keepers, rivets, fasteners, and the like, can rust with consistent use or exposure to moisture.
Most metal fittings are nickel-plated mild steel; others are brass-coated.
While conditioning your leather wear, wipe a small amount on your metal fittings, wiping away any excess.
When u clean your item with water, make sure to dry the metal parts as good as you can, to prevent rust.
Ensure your leather items are long-lasting and beautiful with the instructions given for careful care and maintenance.